5.31.2008

SBSC142: Outdoor Fun


*side note: next to pictures or blurred where our names are at. :)

PPP: Grover


PPP: Tinkerbell 2


PPP: Tinkerbell


PPP: Suzy Zoo Duck & Snail

I'm working on a baby book right now, so I've pulled out my fave babyish paper piecing patterns I adapted. Hope you enjoy them!

5.27.2008

AA: Love


This is for my momma, her bday is this summer (completed WAY ahead of schedule,) so I won't put the pictures of it all up yet. But, I have to say acrylic albums are nifty fun. Made even MORE fun with fab colors of staz-on. Stay tuned- will put up the rest later.

5.14.2008

Mess=Creativity?

Well, my husband is on days right now, which means his alarm goes off about 4am. This morning, instead of rolling over till my alarm sounded at 5, I got up. Instead of hitting the gym at 5:10ish I took the dog on a walk and called it good. If I planned it right, I could get in at least 1.5 hours of play time.
Then I walked in and took a look at how I left it the other day. I guess I should take to heart what we're doing for our early out meetings- spring cleaning.

I'm normally pretty good- but if I've made a lot of stuff in a short time, it gets to looking like this. Throw in birthdays, Teacher Appreciation Week, and upcoming graduations-- well, my scrap room is a mess.

I'm having a crop at my house on Friday evening... so I guess I'd better get to cleaning!

5.11.2008

Find Joy...


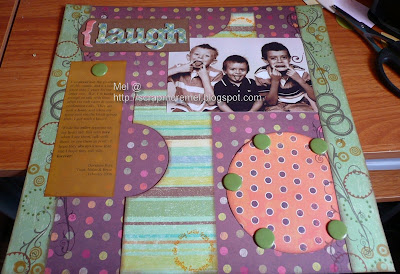
Laugh: a sketch


I LOVE sketches, my friend Heather turned me on to them. So, when I saw one at a blog (1st time there) I had to do it. After all, today I wanted to play all day, and though I didn't (we went moose hunting- to find, not to shoot) I am playing a little bit now.

Live Every Moment


Happy Hellos

5.10.2008

Who knew?


Challenge from a group. Paints, inks, stamps make my my heart go a-flutter.

5.09.2008

Deco'd gift box

*will be stuffed with birthday goodness for a pal

Dream Big

*Getting those graduation cards ready for some of my kiddo's

Family brag book


*This is a collapsing envelope book, made up for someone to show off her family. Small enough that it will fit in her purse, and big enough that it's more than just wallet sized photo's.

5.08.2008

Tutorial: Bag Envelope Card/Album

Supplies Needed:
*brown paper bag (my PB measured almost 6"across the top, closed. You will have to adjust measurements for different sized bags.)
*1 12X12 double sided pattern paper
*Adhesive (I use tacky glue initially)
*Trimmer
*Scorer
*Pretties to decorate it up.


1. First you'll cut your sheet of paper to 7"X12" and you paper bag to 6" tall. (You will be cutting off the TOP of your PB.) If you have a big design, such as what I used, make sure that you cut your paper correctly.

2. Take the PB and fold the bottom in half (you will be refolding.) Then take the 7"X12" piece and score in the center, at 6", and fold.

3. The extra piece, 5"X12", take and cut to 5"X7.25" this will become the flap. Score this in the center, at 2.5", and fold.


4. Adhere one side of flap to the back of the larger piece. It will overlap a bit. If you do not wish it to overlap, feel feel to cut it at 7" instead of 7.25"

5. Put some adhesive on one side of your PB and adhere it to the inside of large flap. The bottom of the PB will rest on the bottom fold of the large section.

6. Then place adhesive on the other side, and press the other flap down on top of the PB. This will make the envelope.

7. Now for the fun- decorate it up! Some found it easier to decorating before adhering the bag inside. However, only you know how you prefer it! Obviously, directions are always changing so do whatever it take to make it easier for YOU to create!

Then come the fun part-- you get to decorate and make it pretty! This was a mini class taken for NSD at Country Scrappin' , hope you enjoy!

5.03.2008

NSD Crop

So, off I went to my LSS in Stevensville, Montana to partake of all night scrapping bliss. I have to say, I am MIGHTY proud of myself. I completed *SO* much, and *gasp* most of it was for ME!!! That's a record people, normally I am working on things for other people. Though, 2 things were a gift- one will not be pictured till later because that person reads this blog.

I have to admit, the entire thing was WONDERFUL. I had 2 friends come with me- and then I knew 4 others there-- that's always fun. I arrived early, VERY early, and nabbed seats, and started shopping right away.

(I ordered QK's ahead of time, and they all, but one, came in!!! YAY! WHo knew they had a paisley one?! I'm so ever excited about THAT one.)


Country Scrappin' is a great place, and Donna was a wonderful hostess. The food-- now, being Mexican and all, I'm very picky about Mexican food. But- wow was it yummy, I need to get one recipe, and when I do, I shall share!

So, anyhow- back to me. These two layouts were super fun. The 4th of July one was a contest submission for the night- and I won!!! It's really nifty.

The challenge was to use everything in the bag- and you could do anything else to it. Once I knew it was okay to not have pictures on it (I didn't bring any) I was good! It started with 2 pieces of card stock (the background,) the tags, squares, butterfly and the plaid frame box. I added everything else. I have to say, I love the way the "4th" came out. The points were mixed. Barn red, and bronze glaze, with a touch of ivory on the top layer, then ivory for the shadow. It's my fave feature on it.

Watch for a tutorial on the brown card looking thing. It's coming!

Tutorial: Coffee Filter Album

Supplies Needed:
*Coffee Filters (whatever size, I normally do 4 or 5, however many, whatever color)
*Card Stock (3-5)
*Scissors & trimmer
*Adhesive (I like tacky glue initially)
*Pattern Paper (3-5)
*Crop-a-dile (or hole punch)
*Binder clips (depending on how you bind)
*Ribbons & pretties


1. First I decide what order to put the papers in. I like to use PP (pattern paper) for the back ground. I put a thin line of tacky glue on the CF (coffee filter) and place it down on the paper. Be cautious! This paper is double sided- make sure you are placing the adhesive side down on the side you DO NOT want to see! Also, make sure if your paper has a lip on it, that you either cut it off before placing the CF, or be sure you aren't hitting it- and ending up with it on your CF!

2. Once it's down, I hold it down (my hands on top of it) for a minute or two. Then I take my scissors and cut it out. I continue this until all CF's are covered.


3. I then take my complimentary CS (card stock) and cut perfect squares that overlap the CF. I like the dimension this creates, you can cut to whatever size you wish. I adhere these with a bit of tacky glue as well. I do place one per double page. It cuts up the PP, and also adds a spunk of fun color & writing space.

4. I then take my crop-a-dile and punch 2 holes on the sides. This will be where I place my binder rings after decorating.

5. After the holes are punched, I will then take the left-over cuts of CS & PP to make square tags to go inside the pockets. These add extra pages to your book, great for writing, holding pictures, or whatever you might want to hide!

6. You are then left with a CF Album! This is the semi-finished product. You see how the squares give it more dimensions, and a bigger work space.

This is where the fun comes in. You'll decorate it to your hearts content!!

To see some of my finished examples, click here!

Have fun!

5.02.2008

National Scrapbooking weekend!

Well, tonight I am hitting an all-nighter!

Yes, a LSS is having a crop- and I get to go to it was 4 friends. That alone should be a lot of fun!
So, come 4pm when I leave the school- I'll hit the house, pack everything into the car, wait for a pal, and then be on our way.

C: I promise the tutorial will be up THIS WEEKEND. I haven't forgotten- I've just been so busy that I've not be online much at all.